This is our newest addition to our family and I am sooo excited about a mantel, yes. . . folks. . . a mantel! (My hubs thinks that is sad). But living in military housing, where all the homes are boring, and bland! This mantel adds so much flare to the room! and I can now hang stockings at x-mas time! YES!
I went to a antique mall, (honestly I thought it had gone out of business) it was now going out of business, which I hate to see. But, it was the weekend, so went in.
Always go into places that are going out of business. I got this for super affordable price! $300 off! I only paid $50! It was from a Savannah home from 1918 that was being redone (which is sad!).
I also bought a box of small antique bottles for $5, and an antique cribbage board (our family favorite game).
I love the idea of having a mantel to decorate, to add festive holiday home decor. So this will be the series!
It is definitely summer here. So I used couples portrait, photo of my son, and a marriage license at first, but it was missing something.
Next, I took my son on a "scavenger hunt", got flowers, berries, and funky shaped sticks! I filled a vase with sand, painted the sticks, and filled the small bottles with our treasure.
Last I added green long stem candles to tie the green together!
Then I sparatically placed some bottles around the mantel! and hung some of the twigs.
and voila! My beautiful mantel! Our newest addition.
Tuesday, June 28, 2011
Friday, June 24, 2011
fathers day hamburger look alike cookies
I made these for my husband for fathers day! little hamburger look a like cookies
Supplies: betty crocker sugar cookie mix(buns), york peppermint patties (burgers), white icing (mayo), red icing (ketchup), sesame seeds (for top of buns).
We baked the cookies, they have to be small! 1" balls
I baked them about 5 minutes, because they were so small! sprinkle the sesame seeds, no flavor, just for burger effect.
They should come out silver dollar sized
Then decorate, zig zag for ketchup, and cement york peppermint patties to the cookie buns.
 |
| and VOILA! Little burgers! |
Wednesday, June 15, 2011
Kitchen Pallet
My new kitchen pallet!
supplies:
old pallet
paint
painters tape
exacto knife
Step1: sand, and gesso ALL pallets! you never know what they could of been carrying, and this will seal any harmful substances in
Step 2: tape off! or let your toddler help
Lol, once he is done, finish it up
Step 3: paint your ideas
I used four colors: white, pale yellow, marigold yellow, and red/orange in what I call charlie brown zig zags!
then I thought it looked a little tribal for my mod style, so I figured it was for the kitchen, so I kitched it up~
and VOILA!
kitchen art
Monday, June 13, 2011
Pallet Decor
I found old pallets around my neighborhood. I gesso-ed them. That allowed a plastic seal on the wood, just in case any random substances were on the wood. Then no exposure would seep through the wood.
This is my empty entry way before my "transformation".
This is double sided. on the door entry side, a simple design.
on the living room side, a tree, with birds on the telephone wire, its also done dimensionally.
This is my empty entry way before my "transformation".
This is double sided. on the door entry side, a simple design.
on the living room side, a tree, with birds on the telephone wire, its also done dimensionally.
The living room side.
all done. Voila. Instant entry way decor
Tuesday, June 7, 2011
old cans to desk organizers
Supplies: old fabric that matches baby jar organizers, hot glue, ribbon, old cans
-Step 1: Using fabric from past projects I wrapped cans with previously used fabric with hot glue gun
-Step 2: Wrap ribbon around top of can, and wrapped bottom edges of fabric around the can
-Step 3: ....VOILA! perfect for scissors, pencils, pens, and wooden dowels!
can and jar organizers
old baby food jars-to desk organization
From difference sized cans-to matching desk organization for my craft room /office
Supplies: fabric, hot glue, ribbon, scissors, jars or cans, chalk paper stickers
Step 1: wrap fabric around jar using hot glue
Step 2: wrap ribbon on lid and around jar for pop
Step 3: use chalk paper on top of the jars, to describe what they hold (mine hold buttons, pins, needles, and left over yarn)
Cost: fabric $2 a yard (only used 6"x6" piece)
+ $1 for 1 foot of ribbon
free jars
$4 (for 6 ft) used about 6" of chalk paper
________
$8 less than that, with plenty tools left over for another project
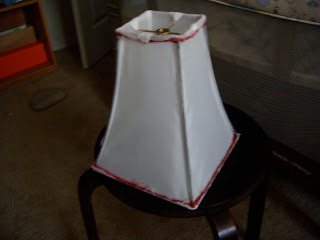
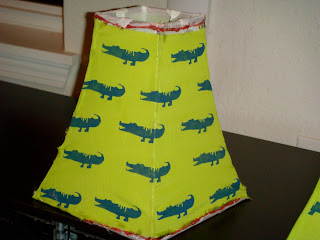
from cheap, ugly lamp shades to WOW!
I had old lamps I got for $10.00, I bought them, they were ugly, but decided to give them a re-ferb!
-Step 1: I stripped the old fabric from the lamp (CAREFULLY) with an exacto knife, so that I could retrace the correct size, with the new fabric
-Step 2: I traced the old fabric, onto new fabric, and cut it out...I chose to stencil and paint my design on the new fabric
-Step 3: I used the hot glue to wrap TIGHTLY! around the edges. (go slow! so that you dont get wrinkles!)
-Step 4: Next, I cut and ironed edges down for the corner coverings
-Step 5: Then, I cut out and double glued ribbon as my trim
. . .and VOILA! custom lamp shades!
Wax paper window decor
Wax paper window decor
Supplies:
Wax paper
crushed crayons
pencil sharpener
iron
towel
pencil
scissors
Step 1: Use pencil sharpener to shred crayons into tiny pieces
Step 2: wax side up (on bottom sheet) place crayons pieces sparingly (dont want it to be too thick) evenly disperse on waxy side of wax paper
Step 3: cover with another sheet of wax paper, waxy side down
Step 4: melt with paper between thin towel, and iron
Step 5: let harden, then draw design, scissor cut the design out
step 6: Iron shapes again (just to make sure all edges are sealed)
 |
| They reflect light beautifully! DIY Stained glass, perfect projects for kids to help! |
 |
| I chose to use fishing line and hang then horizontally because we have a sent under the window! So alligators wont be flying up |
Subscribe to:
Comments (Atom)


 ENJOY!


