Monday, May 30, 2011

memory box


Supplies:
-any size/shape cardboard box
-patterned paper
-rubber cement
-exacto knife
-straws
-silhouette design

I love this idea. You can use any sized box from matchbox, to playing card box, to instant drink mix boxes (such as propel, which I used here).

I cut paper to fit inside the boxes, an outside.
Use one of your favorite memories to record. Use the exacto knife to cut out the negatives for box. Use black, it creates better shadows. I cut a small piece of a straw to heighten one of the images, to create a 3-D effect. To cast a shadow.
The outside of the Box should state "My favorite memories".  The inside lid state the memory. In order to evoke a thought, a memory keep it simple. Let your imagination flourish. 
It does not have to be exactly perfect.
Use the small boxes, keep the opening simple, use the original box design
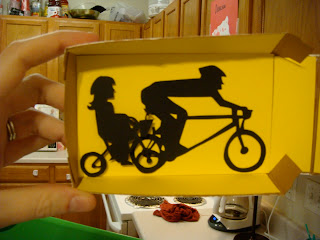
Riding bikes after school every night

Fixing the car with dad


Freezer paper stencils

     I wanted to custom make shirts for Duncan, soon to be fisher, and my husband Jeremy.
 Supplies:
-iron
-fabric paint
-stiff bristled paint brush
-drawing or idea of what stencils will be
-exacto knife
-freezer paper
-shirts, shorts, or whatever you are stenciling on

  Freezer paper is found in any grocery store, near the reynold's wrap
Draw or trace your design on the dull side of the freezer paper
-cut out your design with the exacto knife (I would keep your scraps for reverse designs). REUSE EVERYTHING!
-Place shiny side down on your fabric and place the iron (using the cotton setting) straight on the dull side of the paper. Leave for about 20 seconds, or until paper adheres to the fabric (it wont take long).
These stencils are for my soon to be son Fisher


Once the fabric is ironed onto fabric, go ahead and stipple paint the decal


Wait about 15  minutes for the paint to dry enough to remove the paper, but not completely dry (bc fabric paint can peel if applied too thick).


Then set aside for a few hours to completely dry.
as you cannot reuse the paper once it has been painted, I reuse the negative scraps to create a reverse


Here are some other examples I created, for big bro Duncan Lowe, and Daddy Lowe


here is its negative


and one more color


Saturday, May 21, 2011

sweet treats

Above are smores on a stick.
Pretty basic:
need jumbo marshmellows, lollipop sticks, semi-sweet chocolate, and graham crackers
-melt semi sweet chocolate in a pot over a pot of boiling water

-roll in the chocolate
-roll in graham cracker crumbs
-refridgerate for four hours!
-VIOLA!

Below are cake lollipops.
Had a bunch of friends and kiddos over for "water park" adventure! I made them sweets!
I saw these on another website, I know they are very popular, so I tried it.
-I took Duncan Heinz chocolate cake mix
-baked it according to instructions in cake pan

-took the cake mixed into crumbs in a bowl, mixed with 8 oz of frosting, using hands mix together to a thick consistancy that can be rolled into balls
-place on cookie sheet and refrigerate for two hours.
melt semi sweet chocolate chips
roll cake balls into chocolate
roll into toppings, I used graham crackers, m&ms, and nuts

-refridgerate for four hours
-VOILA!

Friday, May 20, 2011


These are pennants I created for more children decor. Cut out his letters with specific design elements. This is made from paper, and ribbon as its connector. I used a skull, fish, and zig-zags to apply personalize the design.

More lanterns

individually lanterns are a great way to decorate porches, party decor, I choose my soon-to-be son's room.
roll 2 1/2"x4" paper strips, roll into a cone and super glue shut. I used a glue gun, paper, and a $1.00 lantern from Micheals.
Place them spiratically. and glue them down. Spiratic spacing will allow you to fill in holes later.


These are other individual ideas I had. I have developed other designs. You can use any patterns, papers, or even cut out fabrics. like this one.


Tissue paper is a great medium as well.


I choose to bundle for color effect, though cute hung side by side

Homemade stencils

 These are stencils I created from "dry erase poster board". You can buy it for $1.00 next to the poster board in the school supply department in Wal-Mart. It is a more affordable solution to actual stencil plastic. That and an exacto knife. Just trace out a print out, or free hand deigns with a pencil


Tuesday, May 10, 2011

Deck the walls

When we first moved into our house, I wanted to create a statement in my kitchen. Though after four straight days of painting, I was completely OVER IT by the time we hit the kitchen. So this is what I did.

That's right, scattered photos. The frames did not match. I thought that it would develop as I developed favorite pictures, well...it didnt! I thought it was eclectic! IT WASNT! So two years later, I just took spray paint, and a bit of antiquing paint and painted all the frames the same color.
I lined up a piece of tape on the wall, and did a sky-scraper model. Lining the tops and bottoms up, with two inches apart, I think I finally got the eclectic look down!

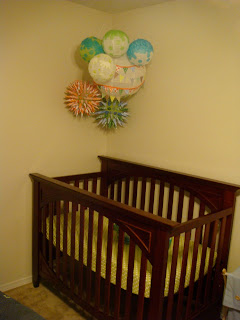
Fisher's lanterns!


I have been working a few weeks on these. They are more dollar store lanterns, covered in printed papers. Rolled 2 1/2"x4" pieces of paper cut into strips. Roll into a pointed cone. I sealed with hot glue gun.

used tissue paper, and printed paper, in earlier blog to create...


and...
the other type of lantern that I made was based on the cutest hippo patterned fabric

all I did was cluster them, in the corner of his nursery. To make his simple room, more color-popping!